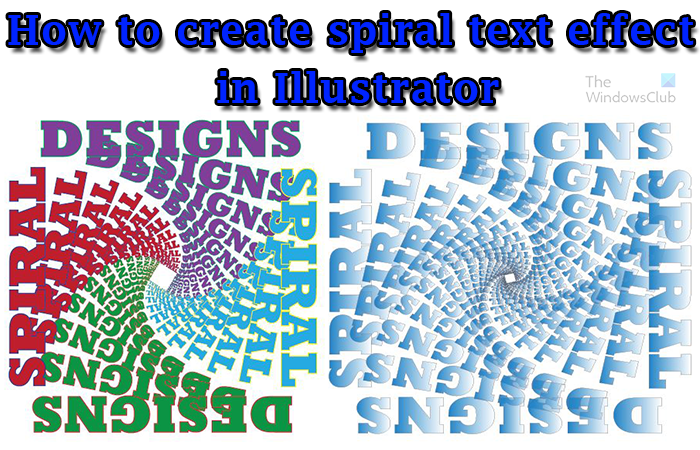
How to create Spiral Text in Illustrator
Creating the spiral text will teach you how to create text, transform, rotate, use the transform effects, and use angles. These are skills that can be used to create other effects. Let’s now so how easy and simple it is to create spiral text effects in Illustrator.
1] Open and prepare Illustrator
Find Illustrator wherever the icon is located, whether on your desktop, taskbar, start menu or wherever you placed it. double click the icon and it will open. When Illustrator is opened go to File then New. The New document options window will appear, enter the options that you want for the document. Enter the dimensions Width and Height, Color mode and Raster effect (resolution). You may change other options if you wish. When you are finished press Ok to confirm your options and create the blank canvas.
2] Write, align and color text
Write This is the point when the texts meet the canvas, decide on the words that you want to write and the font size and color. You can decide to use a gradient or pattern. You will be using four words so you may use different colors on each. The words will become many so choosing how to decorate the words before adding the effect is best, especially if you want to use different colors on each of the four. To write the text go to the left tools panel and click the Type tool or press T. With the Type tool selected, click on the canvas, and type the first word. When the first word is typed select it and change the font and size, if they are not the ones you want to use. If you need a font bigger than 72 pt then you will have to write, then stretch the font to fit the desired size. Align text This is where the texts will be aligned in shape before they are made into a spiral. Write four words to form a square. If the words are different lengths they may form a rectangle, unless you adjust their lengths to make them a square. To keep them the same or close to the same, write one word then duplicate it. To duplicate, hold Alt then click and drag and the word will duplicate. If the word has to be changed then use the Type tool to change it. When the first text is typed, press Alt then click and drag it to duplicate it, place it directly below the first text. remember you are creating a square, so you need to fill all four sides. For the sides duplicate the text and rotate it to fit both sides. When you have four words rotate them as follows: Top Text The top text will not need to be transformed, so it will remain the same. Unless you have another design in mind. Left text Select the text then go to the top menu bar and press Object then Transform then Rotate.
The Rotate window will pop up, press preview, and type in the angle, this side will be rotated 90 degrees. Type in 90 then press Ok and the text will be rotated. You may also use your hand to rotate the texts. Just hover the mouse a bit outside the transform box until the cursor changes to a curved arrow with two heads then drag in the direction that you want to rotate the text. Bottom text Select the text then go to the top menu bar and press Object then Transform then Rotate. When the Rotate window appears, type in 180 then press Ok to confirm. Right text Select the text then go to the top menu bar and press Object then Transform then Rotate. When the Rotate window appears, type in 270 then press Ok to confirm. These are the words aligned to form the square. Change words In this step, you will change the words themselves if you wish. The words there now are all the same, they all say saying SPIRAL. You may want them to be four different words or two sets are going to be the same and two sets different. In this case, I will write two words in repeat the words will be SPIRAL DESIGNS. This is what the words look like, when you write two different sets. You may have to re-align to get things to fit, depending on the words you used. Color text This is the part where color will be added to the words, since this uses two sets of words you may want to color each matching set differently. You may want to keep them as one color. You can experiment and see what you will eventually like. The purpose of your design will also dictate what the colors will be. If it is for a client, the client may have already chosen the colors they want. Design with these colors in mind and find interesting and creative ways to use them in the design. You can add color later on in the design and you will see it shown later. Tip When you have reached the place where all four words are aligned the way they should be, select all of them and hold Alt and then drag, this will duplicate them. Put the duplicate to the side off the canvas, this will help if you want to try a new design. You will not have to start all over.
3] Group text
In this step, you will be grouping the texts so they stay together as one. This way when you move them the alignment will remain. To group the texts, select all of them then go to the top menu bar and select Object then Group, or press Ctrl + G. When you select one text all will be selected and will move as one. If you want to edit one text you can double-click it to go into Isolation mode, when you have finished the edit you can double-click on the canvas to close Isolation mode.
4] Use the Transform effect
This step requires you to use the transform effect. To use the transform effect, select the group of texts then go to the top menu bar and select Effect then Distort and transform then Transform. The Transform effect options window will appear, this is where you will choose the options to transform the words. The first thing to do is to tick Preview so that you can see all changes in real-time. Scale Under scale change the Horizontal and Vertical values to 80% each. Move Under move leave the Vertical and Horizontal values at 0% each. Rotate degrees Under rotate change the value to a number that suits you. Click in the value box and use the arrow key to change the values slowly and watch the object rotate and stop when it is to your liking. If you want different rotation angles put in a negative number or a positive number (move direction keys up or down).
This is a rotation angle with a positive number.
This is a rotation angle with a negative number. Options Under options check the boxes beside Transform object, Transform pattern, and Scale stroke and effects. Make sure that Reflect X, Reflect Y, and Random are all unselected. Copies Under Copies you will enter the number of copies of the words you want to show. In this article, 15 copies were used. The number of copies will depend on how far down you want the spiral to go. When you are finished click Ok to commit the changes or Cancel to close the window without keeping the changes. This is the finished artwork with a value of -15 in the Rotate value box.
5] Change the color of individual sides
You can change the value of individual sides after doing all the effects. To change the colors or even add gradient double-click on the top word for each side and it will go into Isolation mode, you can then click on the color swatch and choose a color or gradient. You can also add a stroke. When you are finished editing double click on the canvas to exit Isolation mode. You can do this for each of the sides.
This is the spiral with different colors
6] Expand
Expand appearance When you have made the changes you will want to expand the artwork. Expanding will allow you to make changes that will affect all of the artwork at once. If you do not expand then you will have to make changes to each side independently.
To expand select the artwork then go to the top menu and choose Object then Expand appearance. If you do not mind each side having different colors and gradients then you can choose not to expand. Expand Go back to the top menu and press Object then Expand. A menu window will appear just press Ok. This is what the artwork will look like when you press ok on the expand menu. Click on the canvas to see the artwork properly Change colors, gradients, and strokes for all the artwork With the artwork expanded, you can now make universal changes that will affect all the artwork and not just one side. Change color Click on the artwork and you will see everything selected, you then go to the swatch and click a color. Be sure to choose the color for the text and not the stroke. All the text is given a color after Expanding appearance and Expanding. All the text is given a gradient after Expanding appearance and Expanding. The texts with a gradient and stroke after Expanding appearance and Expanding. Keep the stroke light because it will get overcrowded as the spiral gets tighter.
7] Save
It is now time to save your hard work, and the first save should be as an Illustrator Ai file so that you can edit it later. You can then Export it as a JPEG or PNG file for other uses. To save as an Ai file just choose File then Save as, when the window appears select the save location and press save. To save as a JPEG or PNG go to File then Export, when the window appears choose the file type then click Use Artboards then choose the save location then press Save. Read: How to recolor objects in Photoshop
What is Expand Appearance and Expand in Illustrator?
Expand appearance and Expand will break up objects into individual colors. This is important in cases where you want to select and edit or delete colors in an object. Using Trace on an image and then expanding the result will allow you to delete the background easily. This can however be complicated if there are a lot of different colors in the artwork.
Why save images as JPEG?
Saving in JPEG is best for images that will be transferred or stored online or on medias with limited space. JPEG files are smaller and take up less space and bandwidth. However, JPEG files will lose quality the more they are saved. This means that JPEG should be used on the last save and should not be resaved if possible.