What does Credential Guard do?
Credential Guard is one of the main security features available with Windows 11/10. It allows protection against hacking of domain credentials thereby preventing hackers from taking over the enterprise networks. With features like Device Guard and Secure Boot, Windows 11/10 is more secure than any of the previous Windows operating systems.
Enable or Disable Credential Guard in Windows 11/10
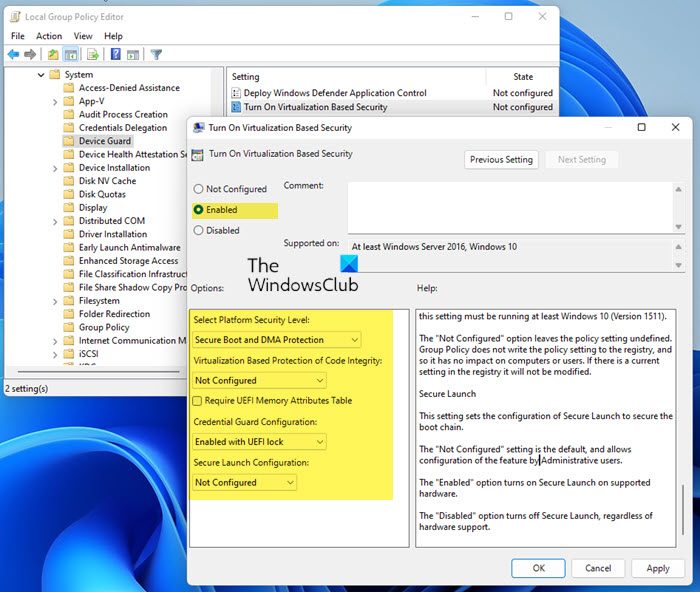
Credential Guard is available only in Windows 11/10 Enterprise Edition. So if you are using Pro or Education, you won’t get to see this feature on your version of Windows. Moreover, Your machine should be supporting Secure Boot and 64-bit virtualization. To enable or turn on Credential Guard, Open Run, type gpedit.msc and hit Enter to open the Group Policy Editor. Now navigate to the following setting: Now, double-click Turn On Virtualization Based Security, and then select Enabled. Under Options, select Platform Security Level box, choose Secure Boot or Secure Boot and DMA Protection. Under Virtual Based protection of Code Integrity, select Not configured In the Credential Guard Configuration box, click Enabled with UEFI lock and then OK. If you want to turn off Credential Guard remotely, choose Enabled without lock. Under Secure Launch Configuration, select Not configured Under Kernal-mode Hardware-enforced Stack Protection, select Not configured Click Apply/OK and exit. Virtualization Based Security uses the Windows Hypervisor to provide support for security services. Virtualization Based Security requires Secure Boot, and can optionally be enabled with the use of DMA Protections. DMA protections require hardware support and will only be enabled on correctly configured devices. Virtualization Based Protection of Code Integrity This setting enables virtualization based protection of Kernel Mode Code Integrity. When this is enabled, kernel mode memory protections are enforced and the Code Integrity validation path is protected by the Virtualization Based Security feature. The “Disabled” option turns off Virtualization Based Protection of Code Integrity remotely if it was previously turned on with the “Enabled without lock” option. The “Enabled with UEFI lock” option ensures that Virtualization Based Protection of Code Integrity cannot be disabled remotely. In order to disable the feature, you must set the Group Policy to “Disabled” as well as remove the security functionality from each computer, with a physically present user, in order to clear configuration persisted in UEFI. The “Enabled without lock” option allows Virtualization Based Protection of Code Integrity to be disabled remotely by using Group Policy. The “Not Configured” option leaves the policy setting undefined. Group Policy does not write the policy setting to the registry, and so it has no impact on computers or users. If there is a current setting in the registry it will not be modified. The “Require UEFI Memory Attributes Table” option will only enable Virtualization Based Protection of Code Integrity on devices with UEFI firmware support for the Memory Attributes Table. Devices without the UEFI Memory Attributes Table may have firmware that is incompatible with Virtualization Based Protection of Code Integrity which in some cases can lead to crashes or data loss or incompatibility with certain plug-in cards. If not setting this option the targeted devices should be tested to ensure compatibility. Warning: All drivers on the system must be compatible with this feature or the system may crash. Ensure that this policy setting is only deployed to computers which are known to be compatible. Credential Guard This setting lets users turn on Credential Guard with virtualization-based security to help protect credentials. The “Disabled” option turns off Credential Guard remotely if it was previously turned on with the “Enabled without lock” option. The “Enabled with UEFI lock” option ensures that Credential Guard cannot be disabled remotely. In order to disable the feature, you must set the Group Policy to “Disabled” as well as remove the security functionality from each computer, with a physically present user, in order to clear configuration persisted in UEFI. The “Enabled without lock” option allows Credential Guard to be disabled remotely by using Group Policy. The devices that use this setting must be running at least Windows 10 (Version 1511). The “Not Configured” option leaves the policy setting undefined. Group Policy does not write the policy setting to the registry, and so it has no impact on computers or users. If there is a current setting in the registry it will not be modified. Secure Launch This setting sets the configuration of Secure Launch to secure the boot chain. The “Not Configured” setting is the default, and allows configuration of the feature by Administrative users. The “Enabled” option turns on Secure Launch on supported hardware. The “Disabled” option turns off Secure Launch, regardless of hardware support. Restart your system.
Disable or Enable Credential Guard using Registry
You need to enable virtualization-based security first as follows: Open Registry Editor and go to the following key: Add a new DWORD value. name it EnableVirtualizationBasedSecurity and set its value as follows:
To enable virtualization-based security, set it to 1To disable virtualization-based security set it to 0
Next, add a new DWORD value named RequirePlatformSecurityFeatures. Set the value of this registry setting to 1
To use Secure Boot only set its value to 1To use Secure Boot and DMA protection, set its value to 3
Now, to enable Windows Defender Credential Guard, go to the following key: Add a new DWORD value and name it LsaCfgFlags.
To disable Windows Defender Credential Guard, set its value to 0To enable Windows Defender Credential Guard with UEFI lock, set it to 1To enable Windows Defender Credential Guard without UEFI lock, set it to 2
Close Registry Editor and restart your computer. You have to remember that Credential Guard will offer protection against direct hacking attempts and malware-seeking credential information. If the credential information is already stolen before you could implement Credential Guard, it won’t prevent the hackers from using the hash key on other computers in the same domain.
How do I know if Credential Guard running?
You can view System Information to check that Windows Defender Credential Guard is running on your computer. To do so, Run msinfo32.exe, and select System Information. Next, select System Summary. If you see Credential Guard mentioned next to Virtualization-based Security Services, it means it is running. TIP: The Remote Credential Guard in Windows 11/10 protects Remote Desktop credentials.